
The ‘glass mosaic wall ‘ is 5 feet wide and sits above the tub by 5 feet.
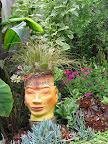
It has a shadow box window cut away at the center where a Balinese stone Buddha head will sit and a sheet of cascading water will pour out from below the Buddha head and fall into the cast concrete bath tub below. ( SEE POST BELOW FOR SKETCH )
The process for building the glass mosaic wall is slightly altered from the normal steps that I would take for making a glass mosaic because of the over all large size of this particular project and because I wanted greater control on blending the colored paper appliqués.
Normally the steps would go as follows ( simplified )
1. Cut Hardie Backer Board to size
2. Paint the Backer Board
3. Apply a thin coat of 2 part epoxy - about as thick as a credit card
4. Apply your under layment of paper, fabrics, photos, glitter + what ever else.
5. Apply another thin layer of epoxy over your paper, photos glitter.....
6. Apply the cracked glass to the surface, covering the prepared board.
7. Let thoroughly dry
8. Grout
9. Seal
Instead I am NOT applying the epoxy to the painted board and then applying the paper cut outs.
I am proceeding along with these steps for great flexibility in blending my applied paper colors
1. cut hardie board
2. paint the backer board
3. individually glue on the paper chips .
4. apply a thin layer of epoxy
5. apply glitter
6. apply tempered glass fragments
7. let dry
8. grout
9. seal
Here are some photos taken of the steps so far :
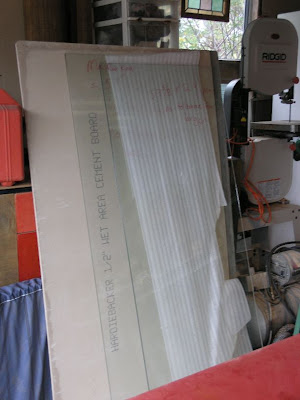
1. - Photo of a standard sheet of 1/2 inch thick Hardie Backer Board 3 ‘ x 5’.
Leaning against the Hardie Backer Board are two sheets of unbroken tempered safety glass that will soon be smashed .
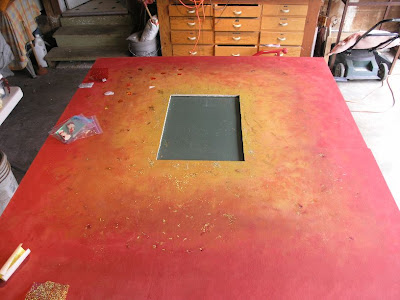
2. This photo shows the Hardie Backer Board painted with water based paints.
Note the hole in the center . This is where the Buddha head is going to go and the cascading water fall.
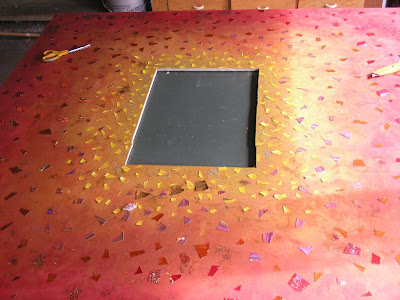
3. In this photo you can see the individual colored paper chips being placed and glued onto the Hardie Board. - This is partially completed . I have another thousand or so more little chips of paper to glue on.
4. This photo shows another table in my shop that has some of the tempered safety glass already broken and ready to be epox’ed ontop of the Backer Board.
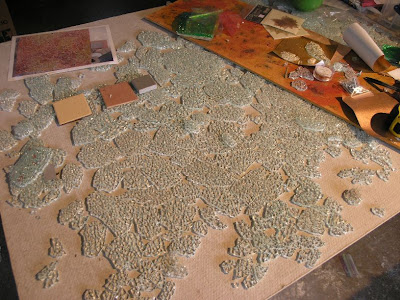
The next step is for the epoxy to be applied to the board.
I’ll capture that Kodak moment when I am finished gluing on the other 999 pieces of paper chips onto the board.


5 comments:
Hey Michelle, This is turning out to be very Arty! Interesting! So you're going to put a transparant mosaic finish over a collage and use it as tile! Is the disembodied Budda head in the center shadow box sitting on the well of knowledge which is pouring out infinitely in to the bathtub below, waiting to enrich the bather throgh osmosis, yes? I'm thinkin this is influenced by your Bali trip, but oddly enough, it sort of reminds me of Max Headroom. Maybe a tiny speaker installed behind the head with the chanting of the Gregorian monks ever so faintly would set the mood... Okay, so I am being out there... Can't wait to see the finished display! Hows the living wall coming? Patrick
Very cool -- it's so Manhattan! I love the warm color.
Patrick,
Gawd, you're sooo funny.
... disembodied Budda head. cha !
The living wall is still living and growing, though I found a couple of aphids hanging out in some of the new bud growth.
So I sprayed them with some Safers insecticidal soap and am keepin' an eye on things.
I'm driving over to Richmond tomorrow to pick up the two part epoxy for the glass mosaic wall.
I'm looking forward to having a full weekend to work on the project.
I got the CD player set up , the frig stocked with yummy elixirs and my respirator mask already for a fun filled weekend of inebriated art work !
yeee ha !
green panther,
welcome and thanks for the comments.
happy holidazes to all !
Too cool! I play with smashed safety glass too! Your's is a much bigger project than anything I have tried!
Bobbi
Can you tell me what kind of epoxy you use? I would love to try this technique. I've seen it done but didn't know that people painted the boards (looks great). Is the respirator for the epoxy? How bad would it be if I didn't use one? lol.
Post a Comment