
Bio Wall Blunder !
Bye Bye Bio wall.
You have beaten me down.
I was warned by a nay sayer that the bio wall would turn into a bio hazard .
Now I have to admit he was right.
It’s just not working.
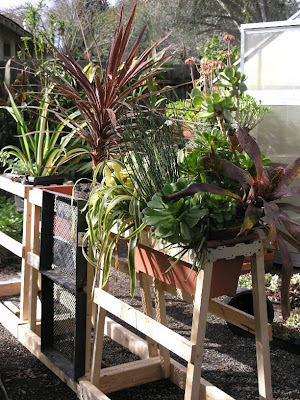
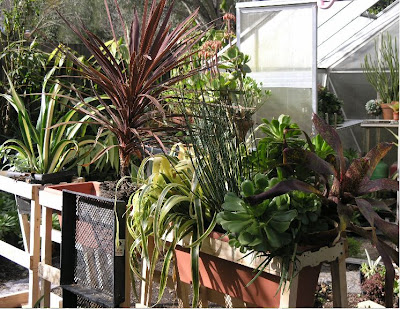
The cuttings that I took back in late October to early November have not created sufficient roots to hold a soil mass together.
When I turn the flats up on edge at a 10 degree angle the whole flat of succulents crumbles into a blob of soil, tiny white filaments of roots and big green leafy plant heads.

I am disappointed to say the least.
After the flats kept falling face first onto the ground I cut up some chicken wire and stapled it to the frame and stuffed the succulents into the chicken wire frame. Sort of like how they make those succulent wreaths, but only way way larger.
Yes it did work but it is incredibly labor intensive and I don’t think the three bio wall sections would make the trip from my house to the Cow palace in decent shape.
I think it will really look like a bio hazard site once it arrives at the Cow palace and that is not a chance I want to take.
There is not enough good tough mature fibrous root mass to keep its shape.
So now onto Plan B.
When I figure out what that will be I’ll let you know.


13 comments:
How about flats of some fairly common to your area ground covers that have been in the flats a touch too long, meaning root bound. Trays of mondo grass for instance. Then you could sprinkle them with some of the succulents plugged in?
Chris that is a good idea. - scrape that... it is an excellent idea !
But now at this late date I am also balancing a budget and to purchase 28 flats of some kind of root bound groundcover @ $ 14 bucks a wack, I am looking at about $400.oo buck-a-roos.
Me thinks I am going to veneer the three separate boxes into three American Clay veneered planter boxes.
As you enter the garden / stage set , to your right is the yellow ( sulphur springs is the name of the color ) American Clay covered shower panel wall .
I think I will mimmick the look and do three planter boxes in the same color American Clay veneer.
That's the plan for now.
I just calculated how much 1" styrofoam I will need as the substrate - one sheet each at $ 12 buck and then the cost of the American Clay product which will be about $ 150 bucks for all three planter boxes.
Total somewhere around $ 200 or so .
I plan on using the same frames but will take them apart and reassemble so that they are plumb rather than have the 10 degree angle.
I even though of getting sod panels and attaching them to the frame but keeping them hydrated once they are at the show will just be a soggy mess around the base.
I think they invented the alphabet for all of my Plan "A", "B's" , "C's" ....... .....
I hope it doesn't get as bad as Plan "D" !
Michelle--
I am SO sorry. Let me spend some time thinking about this...if you need a "plan D" I may be able to come up with something. You know me...I'm the Queen of Contingency plans! The clay veneer sounds lovely...but the bio-wall sounded SO cool.
Thinking of you!
melanie
Couldn't you--attach your empty flats to the structure, fill them with anything that will hold its shape--sphagnum, styrofoam peanuts--even crumpled wads of newspaper or whatever, then staple a landscape fabric or a tight mesh over the whole shebang and then cut holes for your 'plugs'. They'll be supported enough for the length of the show. OR...by a few of those root bound flats, cut them into chunks as back filler then repeat from mesh idea above. Should work fine.
Perhaps you could find a happy compromise between your new plan and Chris' idea? Maybe instead of having the entire wall planted, have most of it veneered and then have a running band of groundcover, or in some other type of pattern/shape. It would be more effort that doing either, but may be able to provide the same effect?
Best of luck - we're rooting for you! (no pun intended... perhaps)
- Audric
ooooo...I have had "a thought"--Actually...Susan sparked it...
Egg cartons. Now, here me out! Couldn't one, I dunno...hot glue or tack eggcartons to plywood...and then plant your plugs sort of slanty wise in the egg cartons? If you use the paper ones they should bio-degrade eventually...and the gray paper ones would probably blend in with the succulents...and would CERTAINLY disappear behind the reindeer moss? You can probably get some at your local Whole Foods or some-such...don't they take them back to recycle?
They'd be like little mini-peat pots?
Or am I delusional?
melanie
Here's another compromise--not sustainably sexy but it would work. Cram (a highly technical term) some sod into your modular units. You might need some slim clear (or not) dividers to increase the number of planting 'cells' and to decrease the gravitational load downward (slumping--another highly technical term). You may also need a small mesh on the back of the flats to enable you to attach the sod units securely. Then plant your succulents and other wall plants with a dibbler or any other pointy cramming tool as plugs within the overall wall of green. Well watered and fertilized over the next month, the turf grass will get long and will should work aesthetically with the wall overall. Most people won't even know what it is. It's cost effective and easy to do. As you reminded me in other years, it's theater.
Susan--that was the phrase I was missing with my egg cartons...
"planting cells." Thank you!
I like the sod idea. I had an additional thought...along the "theater" lines...
Get some plywood sized to cover the frames. Drill with many holes. Affix small plastic pots/sixpack type containers to the back. (Doesn't every one of us have a stack of these somewhere? Heaven knows, I do...) I'd have to actually play with this
to come up with the adhesion method...I'm thinking silicon caulk might work pretty well...
Fill containers with dirt and plant your plugs. Hot glue reindeer moss to whatever plywood shows through the succulents/sedums. Probably a good idea to stain the plywood a light sedum green/gray...
What thinks the group?
Michelle, if I've crossed over into irritating...just let me know. These are the sorts of problems I have to solve whenever we stage musical at church. I have to come up with removable, inexpensive , relatively believable scenery that won't mar the walls. You'd be amazed what I can pull off with 3M command hooks, some drop cloths...and a few flats...
melanie
Wow !
These are all plausible solutions.
You guys are natural garden designers / problems solvers ( that's what we do for a living right ? ! )
I is sunny today and I am going to go out and try a few of these tricks.
I think all of the solutions suggested will work in one form or another but the clencher will be transportability/ fragility , over all weight of the unit, and time efficiency .
We'll see how it goes today.
The continued support is inspiring me to keep on trying.
Thanks.
I raise my morning cup of tea up to you guys.
later gaters.
will report how things go.
Mich
I thought of you and your plight when I saw these... probably too late for the Show, but check out how they're constructed.
Outdoor Wall Planter
Indoor Wall Planter
Thanks for the links Angela !
I had seen those specific wall mount bio wall trays before I started my project and thought they were well designed but a little too pricey for my budget.
At $ 60 dollars per 20" x 20" empty frame, I would need to spend $ 1440.oo to get the size I needed .
That is when I thought I would try using plain old nursery flats to make my wall.
Unfortunately my plan did not work but I am OK with my Plan " B" alternative, which is to make three individual planter boxes.
Thanks for thinking of me, I appreciate the creative thoughts and suggestions.
Michelle
I'm not sure if it's too late but this dilemma of yours has been boggling my mind lately. Heres a somewhat funny solution, whether it would work or not is beyond me but it (in my mind)could easily be set up on site at the show in little time. Four words, Plastic Pocket Shoe Organizers! Spraypaint it a shade of green. Staple camoflauge netting (many different colors and patterns to choose from) to the back of an organizer just as you'd upholster a chairs seat, netting in front of the openings on pocket side, fold it over the edges of the back of the organizers about an inch and a half and staple it to the plastic. Not covering the back will make it appear more flush to the wall you attach it to I would hope. Then cut slits just above each pocket and plug your plants into them. Then, if you want to hide the netting a little, hot glue onto or stuff moss into the netting. I make it sound more like a crafting project than a garden exibit, oh well. Glad I didn't suggest easter grass, now thats just tacky. I was thinking about it though, sadly...
I don't see anything wrong with fooling people at a garden show by using faux stuff, you already are after all...You could just tack some synturf to a wall. Just explain to people that having a biowall is possible with a little more time and money. lol.
Good luck at the show!
Another innovative idea , sans the Easter Egg grass !
Laughing my ass off on that one ! Easter Grass ! love it.
The plastic shoe holder idea is brilliant.
I may have to utilize that in another project.
Darn those shoe holders make interesting garden structures.
I once used a metal shoe holding armature from IKEA to make an air conditioning screen out of.
crafty people we are !
thanks for the great ideas.
If they don't work for this project they are seeds for another !
Michelle
Post a Comment